There are two parts to mapping a route:
- Drawing a line that represents the path listeners follow
- Adding locations
Let’s start with number one, drawing a line. VoiceMap uses the line to measure distances, and an accurate line gives you accurate talk times and word counts. It’s best to imagine listeners following it more or less exactly. (They might! Automatic GPS playback doesn’t require them to keep checking the map, but the route line is displayed in the VoiceMap app, when listeners are out doing a tour.)
There are two exceptions to this, which don’t require a route line: indoor tours and tours without a set route.
A basic route line for walking tours #
Let’s start with a walking tour. It’s VoiceMap’s most popular transport type and it only requires a basic line.
There are a few rules of thumb for walking tours:
- View the map in satellite mode
- Zoom right in, as far as possible, because your line might look perfect zoomed out but actually go all over the place
- Stick to the pavement (or sidewalk) where possible
- Make sure the line doesn’t drift through buildings or into roads
- Use pedestrian crossings where possible
- Routes can turn back on themselves and still play in the correct order, but try to keep a gap between the route out and the return route
- Adding a few extra nodes allows you to curve the line around soft bends
Step by step guide #
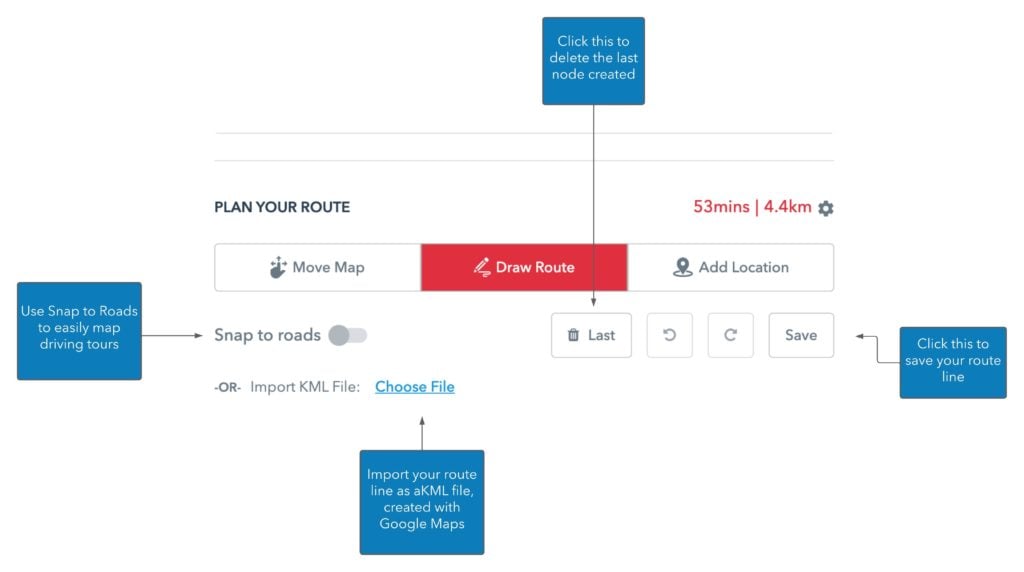
- In the Route Map tab, click on Draw Route.
- Zoom right in to your route’s starting point.
- Switch over to satellite view if it helps, but don’t use the 45 degree tilt. It isn’t accurate.
- Click on the map to add nodes, connected by a line.
- Keep clicking Save as you go, to make sure you don’t lose your work.
- If you make a mistake, you can click on Last (the bin icon), or you can edit the line by dragging the nodes. You can also right-click a node to delete it.
If your route is in an area that’s hard to see either on a Google Map or satellite photography, it might be best to use a GPS logger or equivalent mobile app.
Route lines for driving tours #
Using “snap to roads” in Mapmaker #
There are a few options for mapping the route line of a long driving tour. Mapmaker’s “snap to roads” feature makes mapping out long driving tours straightforward and quick. To access it:
- In Mapmaker’s Route Map tab, click Draw Route
- For driving tours, Snap to roads will be automatically enabled. To turn it off, just click the toggle. It is not automatically enabled for walking or cycling tours. This is because the route lengths are not as long and you’ll need to have more precision when drawing the route lines.
Below you’ll find both a video on using “snap to roads” in Mapmaker.
Using a GPS logger #
If you don’t want to draw the route line in Mapmaker, another option is using a GPS logger. This allows you to record your route as you walk it.
Using Google Maps #
Another option is to use Google Maps to create a KML file, essentially a file that contains the route line data.
Below are instructions on using Google Maps.
- Go to Google Maps.
- From the drop-down menu, select “Your Places“, then “Maps“.
- Click “Create Map” at the bottom of the page. This will open up a new page.
- Untick the box next to Untitled Layer.
- Below the search bar you’ll see a row of icons. Select the “Add Directions” icon.
- A new untitled layer will be created, with A and B tabs. Enter the starting point in the A tab, and the end point in the B tab. You can also add additional points by clicking “Add Destination”.
- You’ll now see the route mapped out on the map.
- Click on “Untitled map” to change the name of your map.
- You can have up to 10 locations per layer. If you need to create more, just create a new layer.
- When you’re ready to export, click on the 3 vertical dots icon next to your map’s name and select “Export to KML”.
- From the drop-down menu, select “Directions from (your location A) to (your location B)”, and tick the “Export to KML File” box.
- Then click “Download”.
- Email the KML file to your editor and they’ll upload it for you.
If the route line is very long, and the map is taking a while to load, then might need to reduce the number of points on the route line. You can find more information about that here.
Indoor tours #
The indoor player does not use an offline map or rely on word counts to work out the time between locations, so you don’t need an accurate route line – or any route line at all. But a simple line can help your editor understand the tour better and it may still make sense to add one in some situations. You’ll find more information about indoor tours here.